
|
|
|
My mailbox has been overflowing in the last few days, in the wake of Borland's historic release of a new line of single-target, single language free versions of their flagship developer suite on September 5, 2006. Most people are confused: "This is the New Turbo. I haven't bought a Borland compiler since Delphi 3. I want to have fun and get current. How do I get it installed? How do I grok the IDE? Where do I start?" Here. Square One. I'll do what I can to help. This document may in time become the core of a new book for me, but for the time being I just want to post what I've learned about the new Turbo line, explained specifically for people who have been down the block for awhile and haven't become familiar with the Delphi product line since Delphi 7, after which a lot of things changed. What's Available in the Turbo Explorer LineThere are four different installable products in the Turbo Explorer line:
Note well that only one of these products may be installed on any given machine. This is not a marketing restriction but a technical one: Only a single copy of the Borland Developer Studio (BDS)—the underlying chassis on which the Turbo products operate—may be installed on a single machine because of the way the BDS affects the Registry and other Windows infrastructure. It's no different from trying to install Microsoft Office twice on the same machine. The software checks to see if it's already there and won't install itself if it can see an earlier install. If you're interested in evaluating more than one of the Turbo products, your best option is to buy the VMWare Workstation 5 virtualizer and create a separate virtual machine for each Turbo product. I can't explain VMs in detail here, but Workstation 5 is very well documented and if you're technical enough to program you shouldn't have trouble installing it and understanding it. Getting the FilesYou'll need to download two files to install any of the new Turbo Explorer line. Which files you download depends on which of the four products you want to install, and which human language (English, French etc.) you want the product to use. There are two parts to the install. The first part is called the "prerequisites." The prerequisites have to be installed before the Turbo product itself. All of the prerequisites are components of the Microsoft .NET platform. This isn't because Borland wants you to write .NET apps. This is because the Turbo products themselves are .NET apps, and they need all of the (many) .NET libraries installed in order to run. It doesn't matter if you only intend to generate Win32 apps. The BDS is a .NET app, and all the .NET stuff has to be there or it simply won't work. Go to the downloads page. Click on whichever one of the four products that you want to download. You will first be asked for an email address:
Don't blow this off; you will need to receive a file from Borland's servers via email in order to activate the product. Borland will not sell this email address to spammers. After submitting an email address, you will see a selector page:
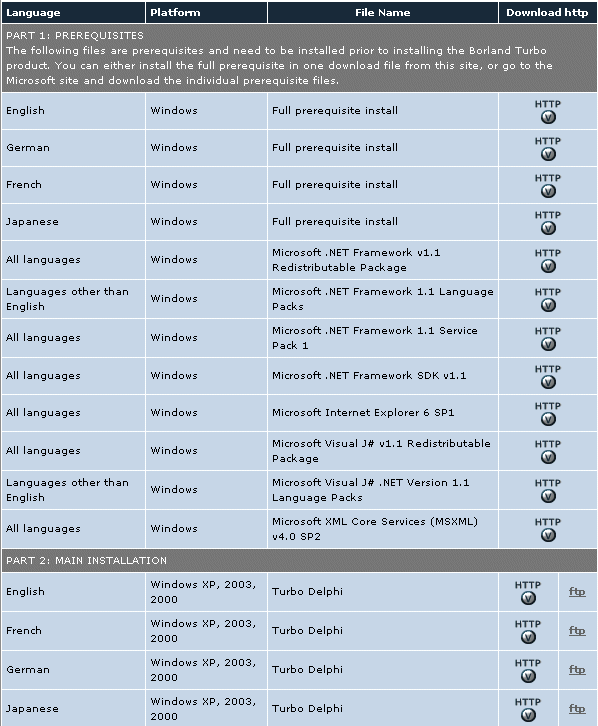
The upper blue section presents options for the prerequisites file. The lower blue section presents options for the main installer. Choose the file according to the language or languages you want to install. (Languages here meaning English or French, not C# or C++.) Choose which of the prerequisite files you want to download. The downloader is based on Java, and if you don't have Java installed on your PC the server will ask you for permission to install it. The prerequisites file is very big (234 MB) so if you don't have broadband you're going to have a tough go. Once the prerequisites file is down, go back and download the main installer for the Turbo product itself. You can use either HTTP or FTP in this case. I found that Borland's servers were quite fast, and the files shot down to me at 480 KBps, which is a good thing—the file itself is 332 MB. Once the second file is down, go read your email. You should have a message from Borland, sent to the email address that you handed them earlier. This message will contain a text attachment. The name of the attachment will be something like reg736.txt. (The number may vary.) Make sure it's saved and don't forget where you put it. You'll need it shortly. InstallationNo matter which of the four Turbo products you choose to install, you have to install the same prerequisites before attempting the install. The prerequisites .ZIP file contains five separate groups of files. When you extract its contents, allow the archiver program to create directories under a convenient location like My Documents\temp (or wherever you generally unzip downloaded archives.) The directories created will be these:
Nothing in any of the files tells you how to install any of this stuff, so don't go looking for a global readme.txt. (That's the main reason I created this document!) The five items must be installed in a specific order. Do it as follows:
Next, you have to put the license activation file where it belongs. This is the file you received as an attachment from Borland. Mine was called reg736.txt but the name of the file you receive may be different. This file needs to be placed in your home directory. For Win2K and Windows XP, this is the directory under C:\Documents and Settings that names the account you'll be using when installing the Turbo product. This could be Administrator, or your name, or whatever you called your primary account when you installed the operating system. If your name is Frank Borland and you used your name for your account, that directory would be this: C:\Documents and Settings\Frank Borland\ Although it would be nice to place the file under All Users or Default User, that won't work. Whew. Once all that stuff has been successfully installed, you can install the Turbo product itself. That's done by executing the Turbo product installer file. For Delphi, this is called TurboDelphi.exe. For Turbo C# it's called TurboCsharp.exe, and so on. These files launch conventional installers, and you can follow the instructions as with any Windows installer. There's one minor weirdness during install: The installer will ask you whether you want the Indy 9 or Indy 10 component suite installed. Choose which one you prefer; if you've never heard of Indy, choose Indy 10. Indy is a suite of Internet protocol components, and it's very useful. Alas, although the installer will unpack and install the Indy component suite that you select, it will not add the components to the component palette. You can use them, but you can't drag components off the palette. This makes using Indy a lot more difficult, but not impossible. The Turbo product installer will not place an icon on your desktop. You'll have to do that manually if you work that way. It will add an item called Borland Developer Studio 2006 to your Start menu Programs listing. At this point, you've got Turbo! Cranking It UpBy default, the Turbo installer will place the product at this path: C:\Program Files\Borland\BDS\4.0\Bin\bds.exe If you'd like a desktop icon, right-click on bds.exe and select Send to | Desktop (create shortcut). Odd Notes for Old Delphi GuysThere's very little in the line of tutorial information on the Turbo products at this time. (September 2006.) I powerfully recommend that you run through Nick Hodges' series of tutorial Camtasia videos on Turbo Delphi. It's a set of videos captured from the Delphi IDE display (using the fine Camtasia Studio utility ) narrated by Nick himself. The tutorials are very basic Delphi, but they are valuable because they show you how to use the BDS IDE. As time allows, I'll prepare some tutorials myself, but we're only four days after release and I need some time to play around with the product and think about it a little. In the meantime, here are a few things to keep in mind if you haven't played with Delphi for awhile:
Of course, if you've discovered anything interesting about Turbo Delphi that people using D7 and back wouldn't know, do drop me a note and I'll work it in. More here as I learn it. |