The Place Where I Build
My Stuff
I've had my own shop
since I was 13, and my parents gave me the old L-shaped kitchen
countertop that would otherwise have gone out on the curb. I put
legs on it, and from then on, I
had my own corner of the basement, and did not have to contend
with my father for the use (and tidyness) of his workbench. It was
always a mess, but it was mine. It was no coincidence that
about then my productivity and skills as a tinkerer exploded. You
have to have your own place to build things. I've been working
on the ideal shop ever since that day in 1966, and now that I'm
sneaking up on retirement, I think I pretty much have it nailed.
In this document I'll share some of the things I've
learned in the last 40 years about how to design a place to work
and how to manage your tools, instruments and...junk.
Have Lots of Walls
When I finally got a
chance to design my dream house in 2002, I thought hard about what
a shop should be like. Much depends on what you build. I don't build
Really Big Things. I build radios and other electronic gimcrackery,
I work in Lego and Meccano, and I build "classic" kites.
(That is, paper-and-stick kites no larger than I am, and generally
a lot smaller.) However, I have a lot of raw materials and tools
(parts, nuts, bolts, wire, test equipment) that all have to be easily
accessible. This led to the insight that I don't need a lot of empty
space. What I need are walls. I need walls for benches and
shelves to store things on. And so what I did is take an eleven-foot
slice of the entire lower level of our hillside home as my shop.
It's shaped like a bowling alley: Eleven feet wide and forty-seven
feet long. (It's also twelve feet high, but that was accidental—our
lower level had to be that high to site the house properly on our
problematic lot.) This means that, not counting the two doors and
the closet, I have 103 linear feet of wall. I put in two heavy-duty
workbenches, one along the short wall against the hillside (and
thus eleven feet long, with a sink) and the other sixteen feet long,
with an outlet strip running its full length, on its own circuit
breaker. The bench with the sink is for work that is not electricity-intensive
(think kites or Lego) and the long bench is for electronics and
amateur radio. I have a computer table with a PC. I have a rack
for hanging a 6' ladder, another rack for test leads and jumper
cables, lots of shelves, and room for a couple of folding tables.
(Alas, they mostly gather junk.)
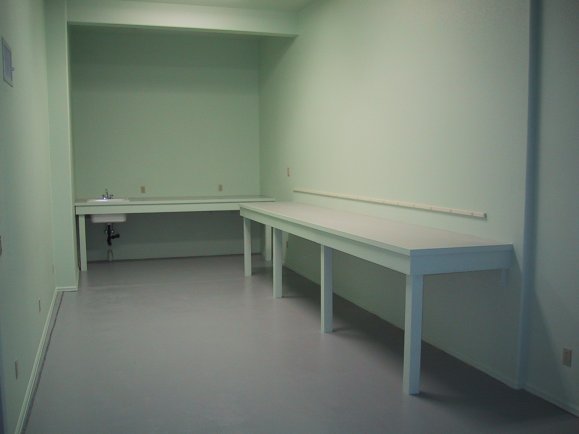
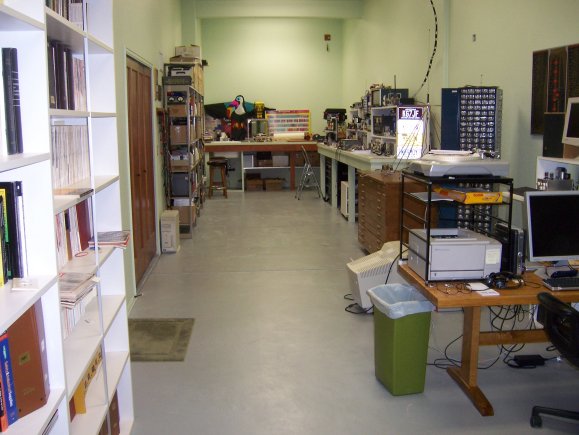
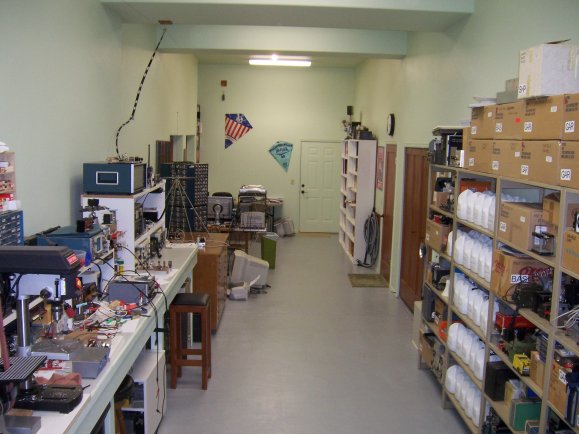
The next two photos show
how the benches and the west (hillside) end of the shop looked when
it was built in March 2004, and then the same view more recently
in May, 2007. The third photo is the view from the west end looking
toward the east end, with the exterior door. I stood on the west
end bench to take it.
I've had the shop for
three years now, but shops are works in progress and there's a great
deal more in my notebooks still to be done.
Have Lots of Light
Next to having lots of
walls, the most important thing in a shop is having lots of light.
All my life I've had workshops in basements, and often tried to
make do with a single bulb in the ceiling, or one junky gooseneck
lamp on a shelf. Not this time. Across the ceiling of my new shop
are six four-tube fluorescent fixtures in three banks, each bank
controllable from its own switch. So I can illuminate each end or
the middle separately, or all at once. When those fixtures are all
buzzing, man, it's bright as day down there!
The contractor put in
four ordinary incandescent bulb sockets between the fluorescent
fixtures, controllable by yet another switch. I was puzzled at first,
but this is routinely done in new construction of spaces designated
as "shops" (as mine was) and lit solely by fluorescent
light fixtures: The incandescent bulbs "fill in" between
the rapidly flickering pulses of light from the 4' long tubes, which
makes the light in the shop easier on the eyes, less likely to cause
headaches, and less likely to stroboscopically "stop"
a rapidly rotating device like a fan or a power tool blade and make
it appear to be standing still. The incandescents also make the
light in the shop a little "warmer," which is good for
us geeks who don't go out in the sun as much as we should, heh.
How High the Bench?
One critical issue that
a lot of guys don't think much about is how high your work surfaces
should be. I took mental notes while building a project years ago,
and determined that building a chassis-based radio involves both
close-up, sit-in-one-place work and run-around-the-shop work, primarily
picking parts and doing chassis metalwork. I also realized (though
it should be obvious) that a tall bench can work well for both sit-down
and stand-up work (get a tall stool!) but a short bench is useless
for stand-up work.
In other words, a
workbench is not a desk. Go tall.
How tall depends to some
extent on how tall you are. The rule of thumb I've used in my last
two shops works well for me: Your bench surface should be as
high as the top of your belt. For me, that's 40 inches. I'm
5' 8" tall in my socks, and wear shoes that add another inch
to my height. In truth, you've got some wiggle room, and a couple
of my friends have told me my bench seems high, and they would go
for 38" or so. If you can't decide, find a piece of plywood
and somehow prop it up to various heights, and see how well your
arms and hands "like" a particular height.
As for the depth of the
bench, that depends on your arms. You want to be able to reach across
the bench to the wall (where all the power outlets are) without
bruising your ribs on the front edge of the bench. For me, that's
33" and no more. My short bench is deeper by design, but is
intended for work that doesn't require electricity.
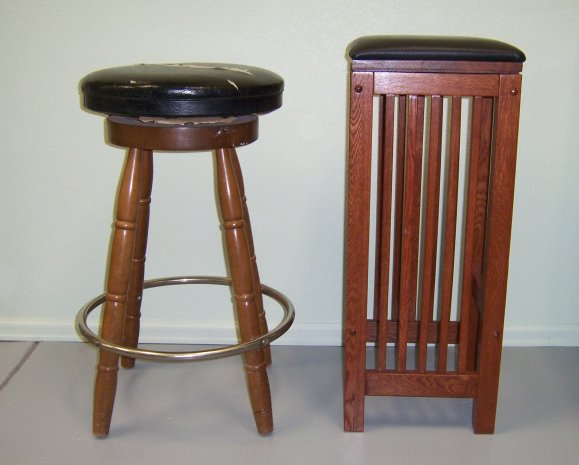
I use an old bar stool
for sitting at the test bench. It's 28" high to the top of
the cushion, and that's just about perfect for me. I bought a second
stool for my ham radio operating position, and at 30" high
it's a little too tall. I have to (carefully) cut about 2"
off the legs before it will serve well. Inches matter! One other
note: Don't get a tall stool that rolls. They exist, but
again, you're not at a desk. You want a seat that doesn't move around.
With a rolling stool, you will have a terrible time keeping your
body steady while your hands try to hold soldering irons or small
parts. Action begets reaction, and you will find yourself drifting
around in front of the bench and flubbing small tasks that require
steady hands and an unmoving body.
Warning: Do not
use hollow core doors or Lauan doors as bench tops. They're not
strong enough and will literally buckle and collapse under the weight
of too much stuff! I recommend doing it right and framing with 2
X 4 studs underneath, with supports for the bench top every six
feet or so. Use 3/4" plywood for the bench tops themselves.
Support the bench top on all four sides. Sand, seal, and paint the
bench so that if you spill PCB etchant it will not soak into the
wood and reek for the next 30 years.
Rule of thumb: The bench
should not flex when you sit on it, assuming you weigh at
least 150 pounds. I went overboard with my current benches (which
are framed with 4 X 4s and will hold at least a ton without suffering)
but better to have the strength and not need it than need it and
not have it. An electronics test bench doesn't typically carry a
lot of weight, but you want the option to add bench tools (drill
press, small bandsaw, sandblasting cabinet, etc.) if you need them
later on.
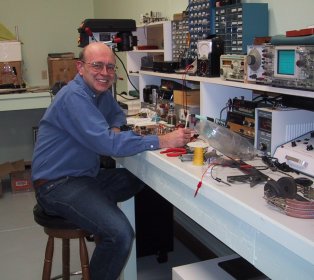
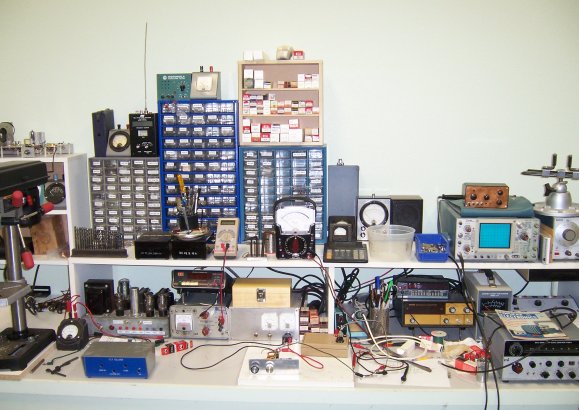
Below is my solder station
and test bench as it exists today. The gear you see (not counting
the drill press) probably weighs a little over a hundred pounds
all together, most of that in the three old-school transformer-heavy
power supplies on the bench toward the left of the photo.
You Can't Have Too Many
Electric Outlets
If you're going to work
in electronics, you're going to need electricity. Duhh. Actually,
you're going to have a whole wall full of gadgets, all of which
need their own place at the electron trough. On my bench I have
(at last count) thirty-three separate devices with 110V cords. Fortunately,
I don't need all of them on at once—and if I did, I'd need
fifty amp service, which I don't have in that part of the house.
What I do have is dedicated
30 amp service to a 16-foot-long "plugmold" strip on the
wall just above the benchtop. The plugmold has its own breaker in
the service box, and an outlet every twelve inches, for a total
of fifteen outlets. Everything that I use regularly is plugged into
the plugmold: Soldering station, oscilloscope, signal generator,
high-voltage DC supply, 12V DC supply, audio generator, frequency
counter, drill press, belt sander, and Dremel tool. My ham station
is housed on a separate Melamine particle board shelf unit that
itself has two short plugmolds, one for each shelf. The whole station
is plugged into one outlet on the master plugmold. This works well
because the way I operate, I rarely have more than one radio turned
on at a time, except for the modern 2M mobile, which is on squelch
most of the time and draws very little power.
I deliberately did not
put a plugmold on the wall behind my short bench, because it has
a sink and I did not intend to use it for electrical work. There
are outlets on the wall, but they are all GFI equipped, as they
must be to pass code.
I didn't put 220V in
the shop, because I really don't use anything big enough to require
it down there. I have 220V in the garage for my lathe, and that's
the only thing I've ever had that needs that kind of power.
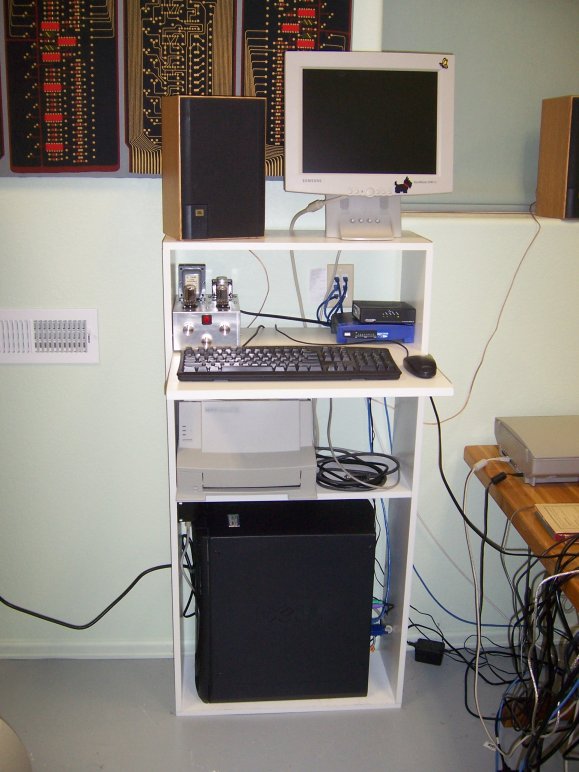
If you're a computer
guy designing a shop, consider putting network cabling in, at least
so that you can have a small computer or laptop somewhere to look
things up on the Web when you need them. I arranged it so that the
terminus of all the CAT5E running throuough the house is in the
shop, along with my cable modem. I built a Melamine board shelf
to hold cable modem, router, and a spare computer, as well as my
homebrew vacuum-tube stereo amplifier.
A phone jack near your
bench is also very handy. For the sake of my ham radio station I
ran 1/4" soft copper ground wire to where my cold water pipe
enters the foundation.
Guys used to run intercoms
to their shops so their spouses could yell for them without getting
hoarse. Useful and maybe cool in its way (especially if you build
the intercom yourself with a tube amplifier) but these days Carol
just calls me from upstairs on my cell.
Heating, Cooling, and
Ventilation
Shops are often built
in "non-living" space like garages and basements, and
when the weather outside gets bad it can get so miserable in the
shop that you can't work. Electronics requires happy hands, and
if they're so cold they're stiff you won't get much done. Make sure
you provide your shop with at least a modicum of climate control.
In a basement this may require a little extra ductwork to bring
heated air to your corner. In a garage it may require a standalone
gas or electric heater.
I now live in Colorado
at 6,500 feet, but when I built my
custom shop in Scottsdale, Arizona back in 1995, the big problem
was not heating but cooling. Most garages are not especially well
insulated, but I put R-30 in the walls and ceiling, and never regretted
the additional expense—especially when it hit 115° outside!
The building (which was nominally a garage but never had a car in
it) had its own heat pump, which was capable of both heating and
cooling. In the nine years I had the shop, however, I remember turning
the unit to "heat" maybe four or five times.
Ventilation is also something
to think about. Electronics work and other tinkerer obsessions occasionally
require the use of smelly stuff like paints and solvents or printed
circuit board etchant. This can be a problem in basements. In a
garage you can (in decent weather) raise the big door. If possible,
place your bench near openable windows. Also consider your family:
When I designed my current shop, I included a door to separate the
shop from the rest of the house specifically to keep sounds and
smells from driving Carol to distraction. A lockable door may also
be desirable if you have small children around.
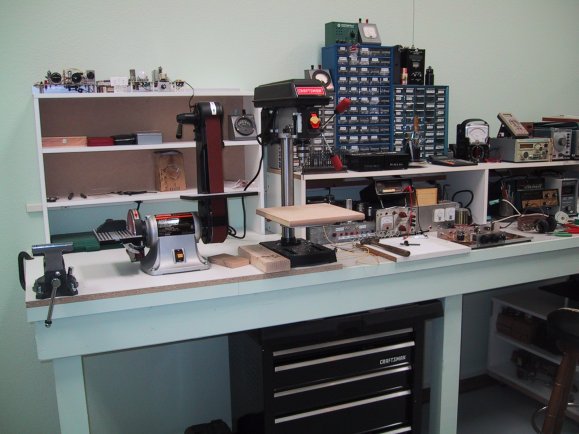
Love Your Drill Press
and Be Close to It
For years, I had my electronics
bench in the basement and my metalworking tools in the garage on
a separate bench. I found that I was chasing between basement and
garage every time I needed to drill a hole in something metal, which
was often. Now, I still keep my metal lathe in the garage (there
was no way to get it down the hill into my lower-level shop) but
I find that a drill press is so completely indispensible to electronics
work that I bought a second (smaller) one at Sears and put it right
on my test bench, only a couple of feet from my solder station.
Small drill presses are cheap these days (I paid well under $100
for this small one) and you don't need a huge unit for chassis and
PCB work, so if you have a press in the garage or somewhere else,
get a second one for your electronics bench. I also have a vise
for bench metal work and a stationary belt sander there. With those
three tools a few steps from my solder station, I
find myself runnintg upstairs to the garage a lot less often.
Make sure you clean up
the metal chips now and then, or they will get into places they
shouldn't, and be dragged into the rest of the house on your shoes.
I have an outlet for the house's central vacuum system in my shop,
with its own hose, and that has been a major blessing when I'm making
heavy use of the drill press, belt sander, and Dremel tool.
Storage for Parts and
Tools
After even a few years
as a tinkerer (and not 40-odd years like me) you will accumulate
an immense amount of parts, tools, and related stuff. The
kind of electronics that I often do involves parts that can't be
easily found, so when I find them, I hoard them. (You just can't
buy Compactron tube sockets at Radio Shack anymore.) A related problem
is that electronic parts come in a near-infinite number of non-interchangeable
varieties. Resistors have resistance and power values. Capacitors
have capacitance values and other parameters making them suitable
for one kind of device or another. (For me, it works out to RF-friendly
vs. non-RF friendly.) Zeroing in on a particular part can take a
great deal of time if all your resistors are loose in one big bin.
That's why I think it makes sense to spend money and effort on parts
and tool storage that allows you to zero in on precisely the part
or tool you need in a matter of seconds. This section explains how
I've done that.
Rolling Tool Cabinets
The modern steel rolling
tool cabinets are so good now and so cheap that it would be crazy
to build your own tool drawers out of wood. I bought a Craftsman
cabinet at Sears when we built this house and it serves me perfectly.
I chose it because its upper surface is a relatively low 33 1/2"
from the floor, and the cabinet slides neatly under my big bench.
Once I lock the wheels, it might as well be built in. (See the photo
above; it's right under my drill press.)
Small, frequently used
hand tools like pliers and screwdrivers are in the shallow top drawer.
Files are in the second drawer. I group larger hand tools like saws
and wrenches in the third drawer. The fourth drawer contains electrical
hand tools, big soldering irons, extension cords, and other electrical
things. The bottom drawer contains clamps of various kinds. (C clamps,
corner clamps, hold-downs, etc.)
I still intend to divide
the top drawer into several compartments so that screwdrivers, pliers,
nut drivers, and miscellany will all be grouped together and not
force me to dig so much.
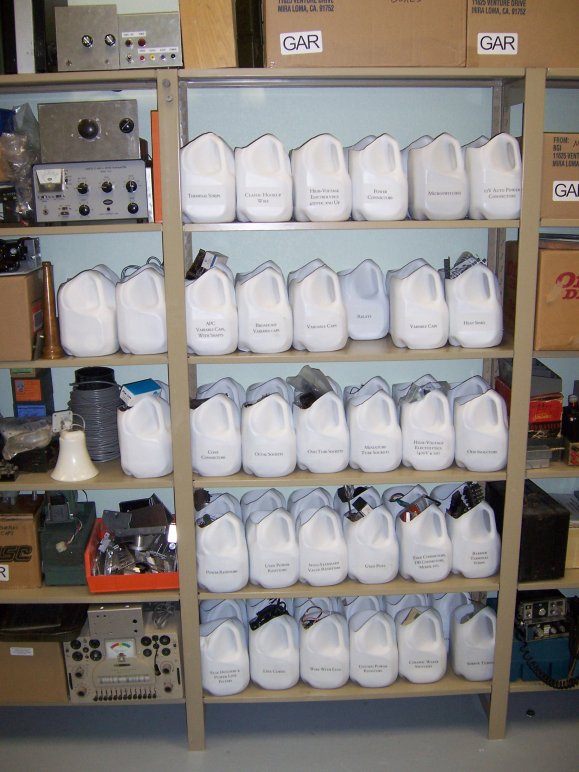
Drink Your Milk
I've been gathering electronics
parts since I was 11 and would raid the local curbs on Garbage Day
to gather dead radios and TV sets to cannibalize. Managing over
40 years of scavenged parts is a challenge. I've tried a lot of
things, but what I stuck with I've been doing for 35 years: Storing
parts in plastic milk jugs. This works best for parts the size of
tube sockets, knobs, or relays rather than carbon resistors or small
caps. Gallon milk jugs fit two deep on the shelves that I have,
and I have 60 of them in only four feet of linear wall space.
Melamine Particle Board
Is Your Friend
In the mid-1990s, particle
board coated with white Melamine laminate became common and cheap
at home improvement stores. Once I discovered it I fell in love.
It's strong, rugged, reasonably easy to work with, and looks good
without paint. When I built my Scottsdale custom shop in 1995, I
built two very large bookshelves and a number of smaller shelf units
out of Melamine board, and took everything with me when we moved
to Colorado in 2003.
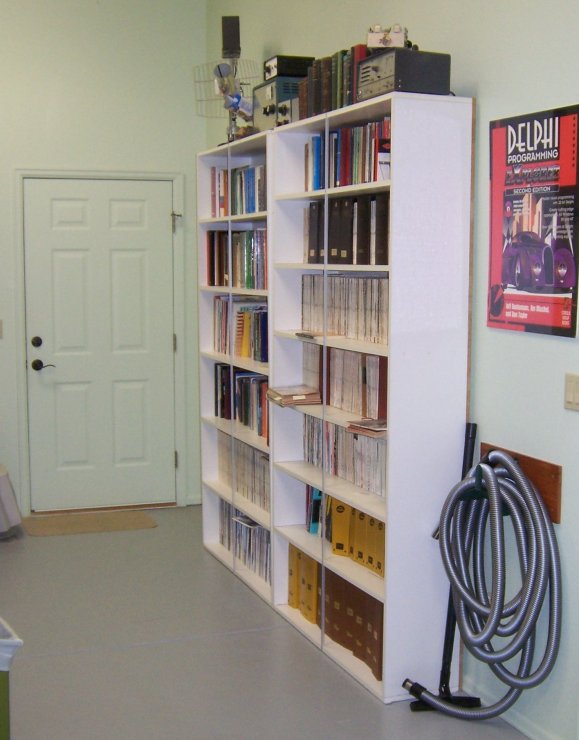
That's when I realized
the big downside to particle board construction: It's heavy. However,
I wasn't doing the lugging myself, and much younger backs put all
the items where they had to go. Keep that in mind: If you build
(as I did) a couple of 4' X 8' particle board shelves in the middle
of your shop, get some help to place them where they belong. The
ones shown above each weighs more than 125 pounds!
Here's a trick that may
help: Design your shelves so that you can get the Melamine board
cut at the store. Home Depot and Lowe's both do this, though they
often charge a per-cut fee. However, they have huge saws that cut
a very straight line, and the resulting pieces mate cleanly without
any cracks. They certainly do better than you'll ever do with a
freehand circular saw. I made a nice little rolling shelf-table
for my sheet metal shear that required just a few cuts, all but
one of which was done at Home Depot.

The unit is extremely
strong, and serves two purposes: It support my shear and also stores
power transformers. It's on casters, and rolls under my bench when
I don't need it.
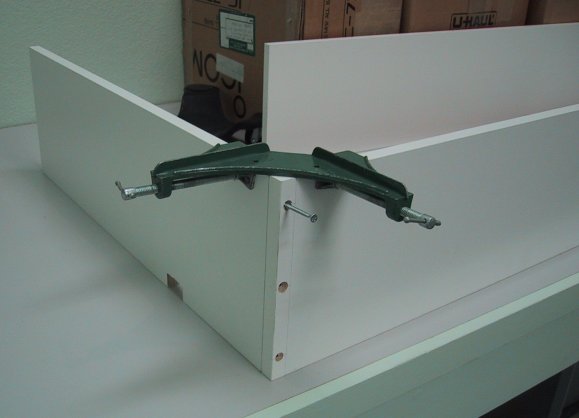
Building with Melamine
board almost requires the use of deck screws and a strong cordless
drill. Drill pilot holes through the outer member and countersink
them. Clamp the pieces at the corners and then drive the deck screws
home. There is white filler putty that will fill the screw holes
and make them difficult to see from more than a few feet away.
There's another neat
trick Melamine offers you that will make your shelves even prettier:
You can buy iron-on edging strip in rolls. Buy a cheap steam iron
at a garage sale and use it for nothing else. (Do not borrow
your wife's!) Carol gave me her old one that leaked, and since I
didn't need steam it's been in my tool drawer ever since. There
is a glue layer on the back of the strip that melts when you apply
the iron to the front of the strip. Practice with the iron and some
scrap board until you get the knack of it; if it goes on crooked
you'll have to pry the strip off with a wood chisel and start over.
If you must cut Melamine
particle board yourself (or any kind of particle board) get a saw
blade with carbide teeth. Particle board is very dense and will
kill a plain steel saw blade in no time flat.
One caution: Melamine
board isn't very "springy" and will go swayback on you
if you put a heavy load in the middle between the supporting ends.
I placed a length of 3/8" aluminum U-channel down the front
face of the two big bookshelves shown above, and screwed the back
edges of the shelves to sheets of 3/4 Melamine board forming the
backs of the units. Under the weight of many years of QST
(second in magazine-mass only to old National Geographics)
the shelves have still bowed a little.
You can see the same
thing on my ham station shelf: The top is very slightly bowed, even
though there has never been anything really heavy on it. (The blue
equipment cabinet at top left is empty and is just there to get
it out of the way.) Note that I inserted a Melamine board vertical
support under the old Hammarlund receiver, which truly deserves
the term "boatanchor" even though I love it and will never
give it up. The Gonset and Clegg radios at the bottom are just too
heavy for shelves and will always remain on the benchtop itself.

I also use a 12"
X 14" piece of scrap Melamine board as a "solder platform"
on which I build PC boards and chassis. It protects the bench top
from scorches and scratches from tools. When the piece of board
gets too unsightly, just cut another.
Build a Rotating "Wire
Tower"
If you work in electronics,
you have to deal with wire. Lots of wire. If you're going to build
radios or other equipment that operates at RF, you will need lots
of kinds of wire: Bare tinned "bus wire," tinned
hookup wire, and many sizes of enameled "magnet wire"
which is not often used for magnets but is essential for winding
RF coils. At some point you'll end up with a ratty cardboard box
full of spools, all of different sizes, and (predictably; this must
be Somebody's Law) you'll have to dig all the way to the bottom
of the bin to find the spool you want.
So manage your wire.
Build a rotating wire tower:
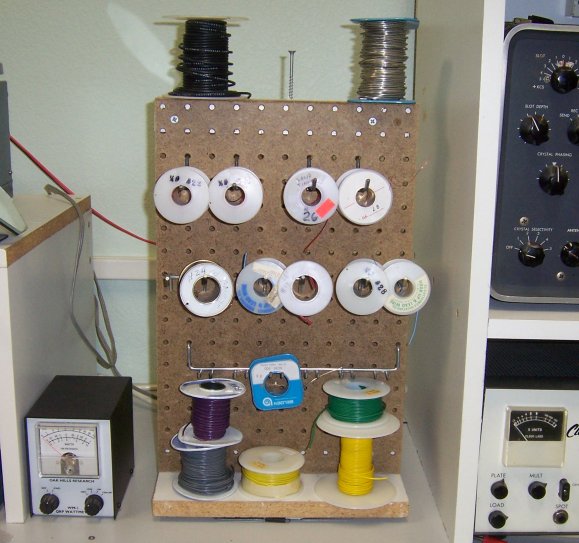
The trick is that it
sits on a Home Depot lazy susan bearing and spins. The other side
is just like the one you can see, except with different spools of
wire. There are three big deck screws on top for holding three more
spools. Here's a side view:
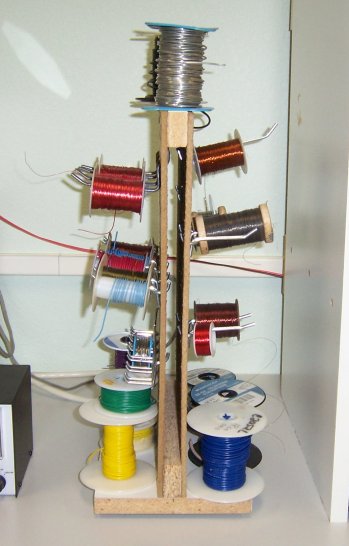 It's
all scrap: A base of Melamine-coated particle board, two pieces
of 1/4" hard-surfaced Masonite pegboard, and a few screws. It's
all scrap: A base of Melamine-coated particle board, two pieces
of 1/4" hard-surfaced Masonite pegboard, and a few screws.
The device is 10 3/4"
wide and 18" tall. The lazy susan bearing is 6" square.
The dimensions were actually dictated by a piece of scrap particle
board that I had in the corner, and it's actually a little smaller
than I might have placed in that space.
The hooks on which the
spools are placed were from a selection of generic pegboard hooks
purchased in a bag from Home Depot years ago.
Another note on spool
wire: Mark the spools with a permanent marker as to the wire gauge,
especially if they're labeled with adhesive labels that may be smudged
out of legibility by your sweaty fingers. Determining wire gauge
by measuring the wire is a tricky business and difficult to do accurately.
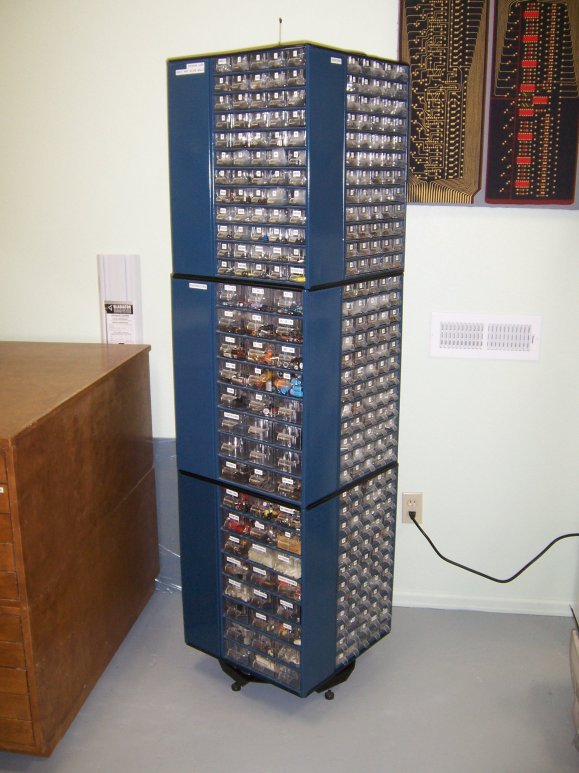
Small Parts and the
Unobtanium Parts Tower
Back in 1990, I ordered
something that I considered an extravagance at the time: A 6' tall
rotating tower made out of twelve plastic parts cabinets stacked
in three ranks of four, set on a gutsy lazy susan bearing. (This
gave me the idea for the wire tower shown above.) When I ordered
it, I could choose which of several species of cabinet I wanted,
and arrange the twelve cabinets any way I liked. I placed them so
that one face of the tower had resistors, and I had enough little
bins for every single 5% value plus a few extras for 1% oddments
and fractional ohm units. No more digging in a milk jug for a 27K
half-watt resistor! On another face I did the same with capacitors,
and the remaining two faces contain bins for many other species
of passive component. (I keep transistors and ICs elsewhere, in
similar bins on my bench.)
It was about $350 in
1990. The tower has moved twice, and I'm astonished at how much
time it has saved me by allowing me to zero in on precisely what
I want without digging in larger, more random assortments. It's
also extremely compact for something that holds so many parts. Alas,
the firm that I ordered it from, Turnkey, is no longer in business
and I haven't seen anything similar for sale elsewhere. If you know
where something like this can be had, do let me know, and I'll link
to it here!
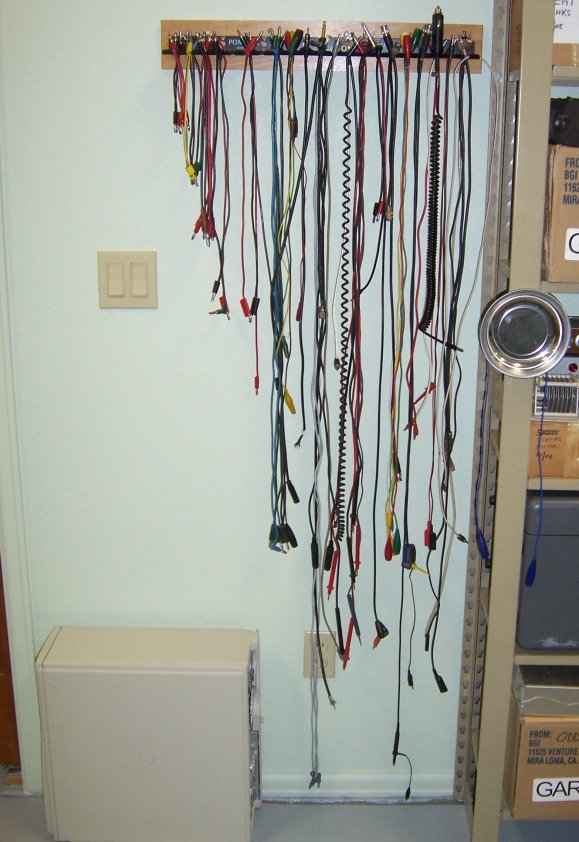
Keep Your Cables in
Order
Electronics is difficult
without test leads and jumper cables, and over time you will accumulate
a box full of them. Then problem is that they get tangled up if
you keep them in a cardboard box, as I did until just a few years
ago. When you dig around in the box, the cables get tangled up in
knots almost by magic, and if you pull too hard on one end of a
cable to get it out of the ratsnest, you can loosen the connectors
on the ends. Rig yourself some kind of cable rack. I bought a couple
of Pomona aluminum cable racks at a hamfest and although I still
have a box with (tangled) cables in it, the cables I use the most
are hanging on the rack and are instantly findable and grabable.
However, you can get the same results with a piece of aluminum angle
bracket and a nibbling tool to cut notches along its length.
Flats Cabinets
One thing I came upon
almost by accident was a wooden "flats cabinet." These
were very common at one point in the graphics arts industry, and
are designed for holding "pasteups" of typeset text and
images before and after being statted for reproduction. Some people
call them "map cabinets" and they work well for anything
big and flat like maps, posters, and so on. I keep Hi-Flier kites
in one drawer, foamcore, cardboard, and PC board stock in another
drawer. My Meccano set takes two drawers all by itself, with the
parts all placed in shallow plastic bins that I ordered (as with
my parts tower) from defunct industrial supply house Turnkey. The
top drawer has PC board lashups and panel meters.
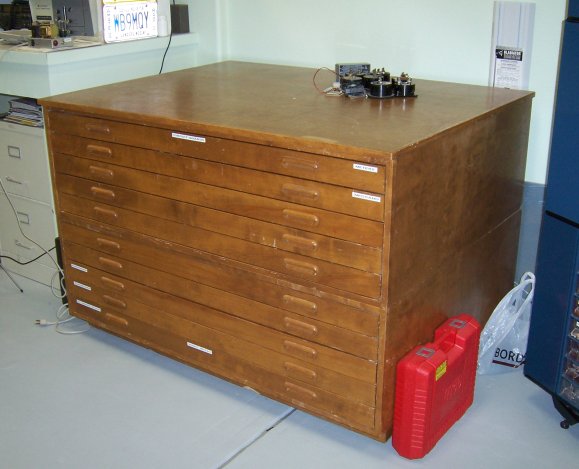
The one I have actually
came from Coriolis Group Books, the publishing company I operated
in the 1990s. We began in 1989 still doing conventional pasteups,
but by 1994 or so we were doing everything digitally, and the cabinet
simply gathered junk. When we moved the office in 1996 I just took
it home. It's in two sections, each having five drawers. The two
sections bolt together, and the whole thing rides on casters. You
can find flats cabinets at used furniture stores from time to time
and they're worth looking for. I see them on eBay regularly, but
because they're so bulky and heavy they're generally listed as "pickup
only" or cost almost as much to ship as to buy!
Not Everything Needs
to Be at Hand's Reach
Something to keep in
mind as you plan parts and tool storage: You use some stuff a lot,
some stuff much more rarely, and some stuff...well, after you're
gone your kids will put it on eBay or out on the curb. I have a
legendary hoard of vacuum tubes, but I've learned that only a handful
of tube types are really useful. So I keep a few tubes that I know
I will use on a small shelf near my soldering station (6T9s, 3V4s,
12AX7s, 6AG7s, 6L6s, you old guys know what I mean) and leave the
others in boxes in the closet. If I really need an 829B I know where
they live but I'm not always tripping over them.
There are odd boxes in
odd places with other things that I rarely use: 1% resistors, O-rings,
big hose clamps, my father-in-law's wire recorder, old homebrew
lashups, the keyboard from a PCjr, and so on. Why some of it remains
with me I'm not sure, but I've managed to prioritize storage to
the extent that I rarely have to go digging, and that's the ideal
you should shoot for.
Also, tidyness is more
than an aesthetic value. If you never put anything away, sooner
or later you will lose track of stuff and constantly be wasting
time hunting for it. (Trust me, I've
been there. More
than once.) If it's not where it belongs, you may even forget
you had it and buy another needlessly. So strive to put things away
when you finish a project, and occasionally even while a project
is underway. Projects cause workbench entropy, which must be beaten
back periodically or all your careful storage planning is for nothing!
Etc.
I keep a 6' fiberglass
ladder in the shop (it hangs on tubing hooks right behind the door)
as well as a stepstool allowing me access to the top of my various
shelves. Falls kill; be careful when you have to go high.
Although I hope they
carry me out of here in my late 90s, you young folks may still be
on a career path that requires uprooting periodically. I chased
promotions and moved every few years in the 70s and 80s, and getting
some of my stuff out of the basement proved so difficult that I
either tore it down and threw it out or left it there. Plan your
shop so that if you have to move, you can get everything out and
onto a truck.
That's it
for the moment. Let me know if you've learned anything about setting
up an effective shop that I haven't mentioned here, and I'll add
it for the benefit of those who are just getting underway.
|